Always work with two windows of the image open when retouching - a close up view for retouching, and an overall view for seeing the efects as they are applied.
header - ekonomi
100% FREE...!!!
Monday, January 31, 2011
Photoshop Tutorials : Lesson # 7: Rotating the image
Choose Image > Rotate Canvas
From the sub-menu choose one of: 180, 90 CW or 90 CCW degrees, Arbitrary (you specify the degrees), Flip Horizontal or Flip Vertical.
Photoshop Tutorials : Lesson # 6: Adjusting the image
Cropping the image
- Select the cropping tool (see right) from the marquee tool submenu;
- Position the pointer on the image, hold down the mouse button and drag over the image area;
- Release the button and press the Enter/Return key.
- Save the document.
Photoshop Tutorials : Lesson # 5: Zooming in and out
Zooming in gives a close up, enlarged view of the document, enabling fine adjustments to be made.
Zooming out gives a reduced, fit-on-screen view of the document.
Zooming out gives a reduced, fit-on-screen view of the document.
Photoshop Tutorials : Lesson # 4: Image size and shape
It is easy in Photoshop to discover the file size, image dimensions and shape of a given file.
 The information bar
1. This is found at the lower left of the image;
2. The document size is show in kilobytes;
3. The left number indicates the file size when closed or sent to the printer. The right number indicates the file size when open. The numbers may be different because Photoshop compresses the layers when files are either closed or printed.
Photoshop Tutorials : Lesson # 3: Selections, Channels and Layers
Selection: a selection is any highlighted area defined by a moving, broken line (“marching ants”). Selections occur when you use a selection tool (rectangular, elliptical, crop) to select parts of your image. Selections are temporary. Selections work on layers (see below).
Sunday, January 23, 2011
Photoshop Tutorials : Lesson # 2 = Tools, palettes and the mouse
Tools and palettes
Today’s course covers those tools shown in bold type below. To use a tool, single-click it. Most tools have options, eg tool thickness and opacity can be
set in the palette which runs along the top of your screen. This palette changes according to which tool you have selected.
Today’s course covers those tools shown in bold type below. To use a tool, single-click it. Most tools have options, eg tool thickness and opacity can be
set in the palette which runs along the top of your screen. This palette changes according to which tool you have selected.
Photoshop Tutorials : Lesson # 1 = Scanning, saving and set-up
To scan images into your computer, you need a scanner attached to your computer
and scanning software installed onto your computer. Scanning software is supplied
with the scanners, often Photoshop. You can also buy Photoshop independently.
and scanning software installed onto your computer. Scanning software is supplied
with the scanners, often Photoshop. You can also buy Photoshop independently.
Saturday, January 22, 2011
Windows Vista/Seven Speed Secret #13: Remove Spyware, Adware, and Malware
Windows Vista/Seven - Speed Secrets : Microsoft Doesn’t Want You To Know! (# 13)
Have you scanned your system for spyware, adware and other
unwanted pests? 1 of 6 computers has some sort of Spyware or
Malware! They dramatically slow down your computer because they
use resources to generate popup ads, send spam, and often
interfere with the operation of good programs.
Have you scanned your system for spyware, adware and other
unwanted pests? 1 of 6 computers has some sort of Spyware or
Malware! They dramatically slow down your computer because they
use resources to generate popup ads, send spam, and often
interfere with the operation of good programs.
Friday, January 21, 2011
Windows Seven/Vista Speed Secret #12: Disable Unnecessary Graphical Effects
Windows Vista/Seven - Speed Secrets : Microsoft Doesn’t Want You To Know! (# 12)
Vista is “sexy” because of its new aero glass transparency effects.
Here is how to enable and disable this new eye candy.
1. Click Start (Windows) button
2. Select the Control Panel
3. Double-click Click Appearance and Personalization
Vista is “sexy” because of its new aero glass transparency effects.
Here is how to enable and disable this new eye candy.
1. Click Start (Windows) button
2. Select the Control Panel
3. Double-click Click Appearance and Personalization
Thursday, January 20, 2011
Windows Vista/Seven - Speed Secrets (# 11) : Microsoft Doesn’t Want You To Know!
Windows Vista/Seven
Windows Vista is a rather heavy operating system with many neat
features, but unfortunately they all come at a price. As a brand new
operating system, it requires a pretty fast system to run well, if
not optimized.
Windows Vista is a rather heavy operating system with many neat
features, but unfortunately they all come at a price. As a brand new
operating system, it requires a pretty fast system to run well, if
not optimized.
Wednesday, January 19, 2011
Windows XP Speed Secret #10: Remove Un-Used Programs & Files
Windows XP Speed Secrets : Microsoft Doesn’t Want You To Know! (#10)
You may have a bunch of software packages on your hard drive that
are no longer needed, or they were gratuitously installed when you
downloaded some other package. Toolbars, file-sharing
programs, free email enhancers, online shopping "companions"
and download managers are notorious for this practice.
Tuesday, January 18, 2011
Windows XP Speed Secret # 9: Disable File Indexing
Windows XP Speed Secrets : Microsoft Doesn’t Want You To Know! (# 9)
Indexing Services is a small little program that uses large amounts
of memory and can often make a computer endlessly loud and
noisy. This system process indexes and updates lists of all the files
that are on your computer. It does this so that when you do a search
for something on your computer, it will search faster by scanning the
index lists. If you don’t search your computer often, this system
service is completely unnecessary. To disable do the following:
Monday, January 17, 2011
Windows XP Speed Secret #8: Enable Direct Memory Access (DMA)
Windows XP Speed Secrets : Microsoft Doesn’t Want You To Know! (# 8)
1. Right-click on My Computer, select Properties
2. Select the Hardware tab
3. Click the Device Manager button
4. Double-click IDE/ATAPI controllers
5. Double-click on the Primary IDE Channel
1. Right-click on My Computer, select Properties
2. Select the Hardware tab
3. Click the Device Manager button
4. Double-click IDE/ATAPI controllers
5. Double-click on the Primary IDE Channel
Sunday, January 16, 2011
Windows XP Speed Secret #7: Run Disk Clean-Up
Windows XP Speed Secrets : Microsoft Doesn’t Want You To Know! (#7)
Both Windows and application programs tend to leave temporary
files lying around on your hard drive, taking up space. A hard drive
that is close to being “full” can cause Windows to slow down or
interfere with efficient disk access and virtual memory operations.
Both Windows and application programs tend to leave temporary
files lying around on your hard drive, taking up space. A hard drive
that is close to being “full” can cause Windows to slow down or
interfere with efficient disk access and virtual memory operations.
Windows XP Speed Secret #6: Clean Your System Registry
Windows XP Speed Secrets : Microsoft Doesn’t Want You To Know! (#6)
Of course, the fastest and easiest way to speed-up your computer is
to allow a software program to do it for you! Although you will find
that all of the adjustments in this book will speed up your system,
the most effective and easiest way to give your computer blazing
speed is to clean up your system’s Registry.
Friday, January 14, 2011
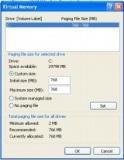
Windows XP Speed Secret #5: Reduce Page File Size

Windows XP Speed Secrets : Microsoft Doesn’t Want You To Know!
Windows XP Speed Secret #5: Reduce Page File Size
Windows XP Speed Secret #5: Reduce Page File Size
Page file size is not constant by default.
Due to this, the operating system has to resize
the file each time more space is required.
This is a performance overhead.
All you have to do is to set the file size to a reasonable limit.
Follow the steps :
Thursday, January 13, 2011
Windows XP Speed Secret #4: Speed-Up File Browsing
Microsoft Doesn’t Want You To Know! (#4)
Windows XP Speed Secret #4: Speed-Up File Browsing

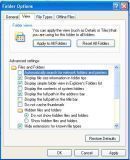
You may have noticed that every time you open “My Computer” to browse folders that there is a slight delay. This is because Windows XP automatically searches for network files and printers every time you open Windows Explorer. To fix this and to increase browsing speed significantly:
1. Double-click on My Computer
2. Click the Tools menu
3. Select Folder Options
Windows XP Speed Secret #4: Speed-Up File Browsing

You may have noticed that every time you open “My Computer” to browse folders that there is a slight delay. This is because Windows XP automatically searches for network files and printers every time you open Windows Explorer. To fix this and to increase browsing speed significantly:
1. Double-click on My Computer
2. Click the Tools menu
3. Select Folder Options
Wednesday, January 12, 2011
Windows XP Speed Secret # 3: Optimize Display Settings
Microsoft Doesn’t Want You To Know! (#3)
Windows XP can look sexy but displaying all the visual items can waste system resources.
To optimize:
1. Click the Start button
2. Select Control Panel
3. Double-click the System icon
4. Click the Advanced tab
5. In the Performance box click Settings
6. Leave only the following ticked:
Tuesday, January 11, 2011
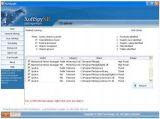
Windows XP Speed Secret #2: Remove Spyware, Adware, and Malware

XP Speed Secret #1: Disable Extra Startup Programs
Have you scanned your system for spyware, adware and other unwanted pests? 1 of 6 computers has some sort of Spyware or Malware! They dramatically slow down your computer because they use resources to generate popup ads, send spam, and often interfere with the operation of good programs.
Monday, January 10, 2011
Windows XP Speed Secret #1: Disable Extra Startup Programs
Speed Secrets : Microsoft Doesn’t Want You To Know! (#1)
There are certain programs that Windows will start every time you boot up your system, and during the startup phase, they're all competing for a slice of your CPU speed. Extra or unwanted items in the startup list will definitely increase your startup time, perhaps by several minutes. Some common examples are things related to AOL, RealPlayer, Napster, instant messengers, and video managers.
Sunday, January 9, 2011
Essential keyboard shortcuts and sanity commands for Linux
This tutorial is sssential keyboard shortcuts and sanity commands for Linux
<Ctrl><Alt><F1>
Switch to the first text terminals. Under Linux you can have several (6 in standard setup) terminals opened at the same time. This is a keyboard shortcut, which means: "press the control key and the alt key, hold them. Now press <F1>. Release all keys."
Switch to the first text terminals. Under Linux you can have several (6 in standard setup) terminals opened at the same time. This is a keyboard shortcut, which means: "press the control key and the alt key, hold them. Now press <F1>. Release all keys."
<Ctrl><Alt><Fn> (n=1..6)
Switch to the nth text terminal. (The same could be accomplished with the rarely used command chvt n. "chvt" stands for "change virtual terminal"). In text terminal (outside X), you can also use <Alt><Fn> (the key <Ctrl> is not needed).
Switch to the nth text terminal. (The same could be accomplished with the rarely used command chvt n. "chvt" stands for "change virtual terminal"). In text terminal (outside X), you can also use <Alt><Fn> (the key <Ctrl> is not needed).
Saturday, January 8, 2011
Adobe Photoshop: the basics
Introduction
What is Photoshop?
Adobe Photoshop is image-editing software. It allows you to transform scanned photographs, slides and original artwork in many ways, for example, by cropping, rotation, resizing and by creating special effects using filters ranging in effect from blurring to mosaics.
Photoshop combines a full range of painting, editing and image composition tools, sophisticated selection tools, and methods for adjusting levels of grey and colour in continuous-tone images.
Lesson 1: Scanning, saving and set-up
To scan images into your computer, you need a scanner attached to your computer and scanning software installed onto your computer. Scanning software is supplied with the scanners, often Photoshop. You can also buy Photoshop independently.
Friday, January 7, 2011
Drawing for classical animation
12 Principals of Animations
Well... I suppose the first thng to cousider in drawing a charadter is it construction. The character must be constructed out of basic shapes. That is say 3 dimensional shapes,
Are you able to draw the basic shapes so that they look 3 dimensional – and not 2D ?
If so.... you are ready to move on... !!!
Wednesday, January 5, 2011
Now, your windows super faster !
Dear All !
This tutorial is meant for increasing the performance of Windows XP, either it can be a fresh installed windows or an old windows.
Actually these r some tips/tricks, which I always apply whenever I do a fresh installation of windows. So here I’m sharing many of those tips-n-tricks:
This tutorial is meant for increasing the performance of Windows XP, either it can be a fresh installed windows or an old windows.
Actually these r some tips/tricks, which I always apply whenever I do a fresh installation of windows. So here I’m sharing many of those tips-n-tricks:
Tuesday, January 4, 2011
Make controlled lighting
 Purpose: Based on a popular lightning tutorial, this version will let you actually control the shape of your lightning, using Photoshop.
 Difficulty: Intermediate
In Short: You'll be drawing a gradient in black and white, use the Difference Clouds filter, Inserve it, adjust layer Levels and layer mode, do some masking, then top it off with some Lens Flare.
Subscribe to:
Comments (Atom)


