2.1 Introduction
In the early days of computing, there were common misconceptions about computers. One misconception was that the computer was only a giant adding machine performing arithmetic operations. Computers could do much more than that, even in the early days. The other common misconception, in contradiction to the first, was that the computer could do “anything.” We now know that there are indeed classes of problems that even the most powerful imaginable computer finds intractable with the von Neumann model. The correct perception, of course, is somewhere between the two.
We are familiar with computer operations that are non-arithmetic: computer graphics, digital audio, even the manipulation of the computer mouse. Regardless of what kind of information is being manipulated by the computer, the information must be represented by patterns of 1’s and 0’s (also known as “on-off ” codes).

Wednesday, February 23, 2011
Friday, February 18, 2011
Computer Architecture # 01 : Introduction
1.1 Overview
Computer architecture deals with the functional behavior of a computer system as viewed by a programmer. This view includes aspects such as the sizes of data types (e.g. using 16 binary digits to represent an integer), and the types of operations that are supported (like addition, subtraction, and subroutine calls). Computer organization deals with structural relationships that are not visible to the programmer, such as interfaces to peripheral devices, the clock frequency, and the technology used for the memory. This textbook deals with both architecture and organization, with the term “architecture” referring broadly to both architecture and organization.
Computer architecture deals with the functional behavior of a computer system as viewed by a programmer. This view includes aspects such as the sizes of data types (e.g. using 16 binary digits to represent an integer), and the types of operations that are supported (like addition, subtraction, and subroutine calls). Computer organization deals with structural relationships that are not visible to the programmer, such as interfaces to peripheral devices, the clock frequency, and the technology used for the memory. This textbook deals with both architecture and organization, with the term “architecture” referring broadly to both architecture and organization.
There is a concept of levels in computer architecture. The basic idea is that there are many levels, or views, at which a computer can be considered, from the highest level, where the user is running programs, or using the computer, to the lowest level, consisting of transistors and wires.
Windows Vista/Seven Speed Secret #17: Disable Automatic Windows Defender Operation
Windows Defender real-time protection against malware continues to run despite having Automatic operation disabled.
In actuality, this built-in malware protector from Microsoft is very poor at protecting your computer from external threats. You are much better off using a 3rd-party software program like XoftSpy for total protection (see Vista Speed Secret #9 for more information).
To disable:
1. Click the Start button
2. Type “services” into the Start Search box
3. Find Windows Defender in the list of programs
4. Double-click on Windows Defender
5. Choose Tools from the top menu
Windows Vista/Seven Speed Secret #21: Shut-Off Windows Hibernation
Windows hibernation background services use a very large amount of system resources. If you are like most people you don’t use the Hibernate feature very much so you may want to disable it to give Vista a performance boost.
To shut down Hibernation:
1. Click the Start button
2. Select Control Panel
3. Click the Classic View on the left hand side
4. Double-click on Power Options
5. Select Change Plan Settings
6. Choose Change Advanced Power Settings
Windows Vista/Seven Speed Secret #20: Shutdown Remote Differential Compression
Remote Differential Compression checks the changes of your files over a network to move them with as little bandwidth as possible instead of transferring an entire file that has previously been moved.
Obiviously, the average home PC user has NO need for this service. With it constantly checking for file changes, this service will greatly slow system performance.
To shut down this service:
1. Click the Start button
2. Select Control Panel
3. Click Classic View on the left side of the window
4. Double-click on Programs and Features
5. Click Turn Windows Features On And Off on the left side of the window
Windows Vista/Seven Speed Secret #18: Turn-Off Un-Needed Features
There are many new features in Windows Vista that are installed by default that you may not need. These extra and un-needed features can slow down your computer and take up more storage space.
Windows Features can be un-installed using the Windows Features utility. Follow these steps to uninstall applications such as the Windows Fax and Scan and many more.
To Turn-Off Some Un-Needed Features:
1. Click on the Start Button
2. Select Control Panel
3. Under Programs click Uninstall a program
4. On the left side menu, click on Turn Windows features on or off
5. Scroll through the list as shown below and uncheck from any feature you do not want installed.
Windows Vista/Seven Speed Secret #19: Disable Unused Services
Services are background processes which keep running waiting for a response, so if you don’t use the application it still runs and slows PC speed.
The average user doesn’t need many running.
1. Click the Start button
2. Type msconfig in the Start Search box, hit enter
3. Click the Services tab
4. Uncheck the unneeded startup items (examples below)
Desktop Window Manager Session Manager - Provides Desktop Window Manager startup and maintenance services. Uncheck to disable.
Diagnostic Policy Service - Enables problem detection, troubleshooting and resolution for Windows components. Uncheck to disable.
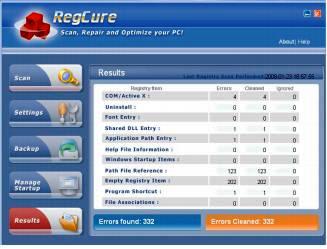
Windows Vista/Seven Speed Secret #16: Clean Your System Registry
Of course, the fastest and easiest way to speed-up your computer is to allow a software program to do it for you! Although you will find that all of the adjustments in this book will speed up your system, the most effective and easiest way to give your computer blazing speed is to clean up your system’s Registry.
Your computer is like your car: it needs periodic maintenance to keep it running at optimum performance. Installing and un-installing programs, surfing the Internet, emailing, and other everyday activities create a sort of “sludge” that builds up in your computer over time, much like an automobile engine.
Your computer is like your car: it needs periodic maintenance to keep it running at optimum performance. Installing and un-installing programs, surfing the Internet, emailing, and other everyday activities create a sort of “sludge” that builds up in your computer over time, much like an automobile engine.
Windows Vista/Seven Speed Secret #15: Disable Automatic Disk Defragment
Windows Vista uses an always-on defragment set up that isn’t that necessary and will cause your system to slow down. Remember to run a defragment manually once a month.
Windows Vista/Seven Speed Secret #14: Shutdown Search Indexing
Windows Vista Search Indexing is constantly checking the files on your system to make their information available for quick searching. This is helpful, but can severely slow system performance as the average user doesn’t use the search function frequently.
Thursday, February 10, 2011
PREVIEW: ADOBE PREMIER PRO AND APPLE FINAL CUT PRO.
 > Versus <
Dear All !
The top spots in mid-level video editing are held by Apple and Adobe, and many people are looking for a specific comparison between Premiere Pro and Final Cut Pro (FCP).
FCP tends to be more popular amongst professional editors, although this can also be attributed to the popularity of Mac vs Windows in the same market. It is often said that FCP is more stable and/or faster than Premiere, but this is more a reflection on the operating system than the software. Having said this, in my experience Premiere is very stable on a well-configured Windows system.
FCP tends to be more popular amongst professional editors, although this can also be attributed to the popularity of Mac vs Windows in the same market. It is often said that FCP is more stable and/or faster than Premiere, but this is more a reflection on the operating system than the software. Having said this, in my experience Premiere is very stable on a well-configured Windows system.
Sunday, February 6, 2011
Photoshop Tutorials : Lesson # 19: Storage media
The digital images you capture can be stored on the camera memory cards or on your computer hard disc.
Once you begin building-up a library of digital images, and you want to be able to take them to bureaux or other computers, then removable storage media is required.
Once you begin building-up a library of digital images, and you want to be able to take them to bureaux or other computers, then removable storage media is required.
Photoshop Tutorials : Lesson # 17: Building up a composite image

Saturday, February 5, 2011
Photoshop Tutorials : Lesson # 16: Using special effects filters

Friday, February 4, 2011
Photoshop Tutorials : Lesson # 15: Adding text
Thursday, February 3, 2011
Photoshop Tutorials : Lesson # 14 Adjusting colours and contrast
The brightness and contrast, amount of true whites and blacks in an image, can be altered in several ways.
• The Adjustments > Brightness/Contrast panel from the Image menu. This gives blanket results across the entire image. For finer control, use one of the two methods below.
• Levels
Choose Adjust ments > Levels from the Image menu.

• The Adjustments > Brightness/Contrast panel from the Image menu. This gives blanket results across the entire image. For finer control, use one of the two methods below.
• Levels
Choose Adjust ments > Levels from the Image menu.

Photoshop Tutorials : Lesson # 13: Adjusting a selection or layer’s opacitys

Photoshop Tutorials : Lesson # 12: Rotating a selection
- Make a selection using the Marquee tool.If you rotate this selection, blank space(grey and white pixels) will appear in thegaps left behind.So you may want to copy the selection either to a new layer (Copy, Paste) or copy it within the existing layer (alt/opt and command keys and drag selection) first, so that rotating it reveals the original background rather than empty space.
- Choose Transform > Rotate from the Edit menu. Handles will appear at the corners of the selected area;
- Position the pointer on a handle;
- Drag the pointer either clockwise or anti-clockwise before releasing. The image will rotate.

Photoshop Tutorials : Lesson # 11: Moving and duplicating selections
Cutting the selection for use elsewhere
1. Choose Cut from the Edit menu.. This leaves the area empty (indicated by grey and white pixels).
Copying the selection for use elsewhere
1. Choose Copy from the Edit menu.
1. Choose Cut from the Edit menu.. This leaves the area empty (indicated by grey and white pixels).
Copying the selection for use elsewhere
1. Choose Copy from the Edit menu.
Tuesday, February 1, 2011
Photoshop Tutorials : Lesson # 10: Making simple selections
Photoshop enables selections of elliptical, rectangular and freehand shapes to be chosen. These selections can then be cut, copied, duplicated, erased, rotated, moved or pasted elsewhere. They can also have their opacity and other attributes changed.
Photoshop Tutorials : Lesson # 9: Duplicating irregular shaped elements
Because the rubber stamp tool picks up whatever areas it runs over, you can also use it to duplicate irregularly shaped elements in a document. Regular (square or round) objects can be selected with the selection tools
Subscribe to:
Posts (Atom)